
If you are keeping planted aquariums, sooner or later there will be a time where you will want to try supplementing co2 to help your plants grow. But despite coming along way from the early aquascaping years, some still see co2 more as a source of problems than a benefit. There are a few reasons for this and here are some of them:
- co2 systems are expensive
- Aquariums using it require more maintenance
- An aquarium using co2 tends do be more expensive to run
So the question as to be made.
Do aquarium plants need co2?
Yes
Do all aquariums need co2?
No
All plants need co2, but some of them need it more than others. Basically plants use photosynthesis to grow.
This process is the ability that the plants have to capture light from the sun, and use it to turn co2 and water into chemical energy that they can then use to grow. This chemical energy comes in the form of glucose and the byproduct of this process is oxygen.
Light + co2 + water = glucose + oxygen
To grow they also need micro and macro nutrients, these help in the production of proteins, DNA and more chlorophyll. The entire process leads to growth, and increase in the plants biomass.
Plants need co2 because it is a source or carbon which in turn is necessary not only to the creation of glucose, but of fats, proteins, DNA and clorophyll, basically carbon is essencial for plant growth.
But like I said before some plants need it more than others, different plants from different parts of the world have adapted to different needs. Meaning some require more co2 than others.
This is mostly driven by the amount of light the plant needs, if the plant needs a lot of light to grow, than it also needs a lot of co2, the two walk close in hand with each other, because plants can only use the light to fuel photosynthesis as long as they have access to enough water and co2 to be converted into chemical energy. Water is never a problem in an aquarium, but if you don't have co2 then the plants will not be able to use the extra amount of light, which in turn leads to algae.
Nutrients are also very important because even if the plants store enough chemical energy they cannot grow if they do not have the nutrients required to do it.
But this article is only about co2, and as said some plants like anubias for example have adapted to live in the shade of other plants. hence they don't absorb a lot of light which in turn means they don't need a lot of co2, obviously this also means they grow slower.
In the aquarium there is always some amount of co2, this is either provided by gas exchange, basically it is gas being exchanged between the water an the air at the surface, or from the respiration of fish, which absorb o2 through their gills and expel co2. Decaying plant matter and fish waste also leach co2 into the water. However these amounts are relatively small, but for some plants like anubias and java ferns this small amount is enough for them.
This is were most of us start, in our beginner days most of us start growing plants without supplementing it, in what we call a low-tech aquarium. And a lot of people do keep beautiful aquariums using this method, growth is slower, not as lush and vibrant but overtime one can keep a very successful planted aquarium.
However for most of us there comes a time where we want to give a try to co2, it can be because we want a challenge, or because there is a plant we want to try that can't grow without it , can also be a desire to grow plants faster and more lush and vibrant. There is a time one will definitely want to delve into co2 injection.
The pros of doing it are as follow:
- Faster growth
- being able to use more types of plants as some cannot survive without co2
The cons:
- Expensive to buy a system
- Harder to maintain
- Running a co2 tank can have added costs
The question is do the benefits outweigh the costs, to me they do, because even if you invest in a pressurized co2 system, this cost will pay itself off over the years. Co2 systems tend to run years without breaking down, if used properly and well maintained, it is only a cost that will have to go trough once. Over the years the faster growth of plants may even provide you with a small stream of income to recoup the cost if you sell your cuttings.
When it comes to maintenance a tank using co2 will no doubt require more water changes and have more risks of catching algae, which in turn requires more maintenance, plants will also grow faster which in turn requires more trimming, its a question if one is willing to put in the work a co2 induced aquarium requires. Besides with a good maintenance scheme and a good balance between light, co2 and nutrients an experienced hobbyist can greatly reduce the amount of maintance required, though there will always more to do than on a non co2 aquarium.
As for the added costs of running a co2 tank, there are some, in case of pressurized, refills will be needed and obviously if co2 is being added more light and fertilizers will be needed.
As an aquascaper it is always worth because having co2 in the mix allows for more creativity when designing my aquascapes.
So lets look have some of the ways one can supplement co2 into the tank:
Liquid carbon (seachem excel, easylife easycarbo etc.)

Lately there has been a lot of discussion about whether Liquid carbon is co2 or not, the quick answer is that its not.
It's actually gluteraldehyde a substance that while very toxic, can be used in the aquarium in small amounts. However its actually more known for its algaecide properties than it is for releasing co2 in the aquarium.
Its algaecide properties promote healthier growth and its thought that it may to some degree be converted into glutaric acid which through a series of reactions may produce some co2.
I am not a chemist, so i won't delve much deeper into the Liquid Carbon thing other than to say that my personal experience trough the years i have found it to be much more effective in algae control than as promoting plant growth as a co2 supplementation method.
But if you really want to delve into the complex chemical processeses of it you can find a more detailed article about it here from John Valdez at Waterforest aquatics or this one by Karen Randall at Sunken gardens.
Liquid carbon (seachem excel, easylife easycarbo etc.)
Lately there has been a lot of discussion about whether Liquid carbon is co2 or not, the quick answer is that its not.
It's actually gluteraldehyde a substance that while very toxic, can be used in the aquarium in small amounts. However its actually more known for its algaecide properties than it is for releasing co2 in the aquarium.
Its algaecide properties promote healthier growth and its thought that it may to some degree be converted into glutaric acid which through a series of reactions may produce some co2.
I am not a chemist, so i won't delve much deeper into the Liquid Carbon thing other than to say that my personal experience trough the years i have found it to be much more effective in algae control than as promoting plant growth as a co2 supplementation method.
But if you really want to delve into the complex chemical processeses of it you can find a more detailed article about it here from John Valdez at Waterforest aquatics or this one by Karen Randall at Sunken gardens.
DIY co2
This is where most of us delved into co2 suplementation back in the day. I first used DIY co2 in 2006, its an easy and cheap way of adding co2 into the tank.
Basically you can build such a system out of a few empty plastic bottles, some co2 hose, silicone and then use a mixture of yeast and sugar to create a reaction that will slowly release co2 into the aquarium.
Now this almost sounds to good to be true, isn't it. That's because there are a few problems with such a system.
Now there are some ways of going around some of these problems, for larger aquariums its been known people using multiple DIY systems at the same time to make sure enough co2 is being added, this also helps out in avoiding the decrease of co2 output as one system can be refilled one week, and the other the week after, making sure that the is always enough co2 being produced as one gets depleted, the other one will be at maximum output.
But overtime this system just becomes too much of a hassle and its really unsighly to have plastic bottles and pipes everywhere.
Still its the cheapest way of adding co2 into the tank.
The photo below is my tank circa 2006 using a DIY co2 system.

This two videos by the Kinf of DIY on how to setup one of these systems.
This is where most of us delved into co2 suplementation back in the day. I first used DIY co2 in 2006, its an easy and cheap way of adding co2 into the tank.
Basically you can build such a system out of a few empty plastic bottles, some co2 hose, silicone and then use a mixture of yeast and sugar to create a reaction that will slowly release co2 into the aquarium.
Now this almost sounds to good to be true, isn't it. That's because there are a few problems with such a system.
- First off with a DIY system you can't really control the output of co2 into the aquarium, meaning you can either have too much co2 or not enough at any given time of the day. And this can often lead to algae issues.
- Second overtime the amount of co2 being produced decreases considerably which often leads to not enough co2 being supplemented.
- Third is that it generally only lasts a couple of weeks at best, meaning regular refills will be needed.
- Fourth you cannot shut it down when the lights are off, basically the chemical reactions will still occur inside the system even if you stop the flow into the aquarium, meaning co2 will still be released inside the bottles. In the past this has lead to some catastrophic accidents with bottles blowing up under pressure creating a huge mess. Not being able to stop it can also lead to too much co2 in the tank when lights off and its dangerous for your fish.
- Finally its only really suited for smaller aquariums, i have used it with success in a tank up to 120 litres.
Now there are some ways of going around some of these problems, for larger aquariums its been known people using multiple DIY systems at the same time to make sure enough co2 is being added, this also helps out in avoiding the decrease of co2 output as one system can be refilled one week, and the other the week after, making sure that the is always enough co2 being produced as one gets depleted, the other one will be at maximum output.
But overtime this system just becomes too much of a hassle and its really unsighly to have plastic bottles and pipes everywhere.
Still its the cheapest way of adding co2 into the tank.
The photo below is my tank circa 2006 using a DIY co2 system.

This two videos by the Kinf of DIY on how to setup one of these systems.
Co2 aerosols
Co2 aerosols are inexpensive simple co2 systems, they are very similar to to the DIY method, except that for start its not DIY, second you are not relying on a chemical reaction to dose co2 into the aquarium.
The system comprises of a Aerosol can connected to a diffuser, now this diffuser is basically a container that sits inside the tank and can hold a limited amount of co2 that gets slowly released into the water.
The way it works is the hobbyist releases co2 from the aerosol can into the the holding diffuser which in turn diffuses it into the tank.
The benefits of this system are:
- Its relatively inexpensive
- your actually dosing co2 into the tank not rellying on chemical reactions that slow down overtime
The disadvantages are:
- Needs regular monitoring as the holding diffuser empties you need to be around to refill it or you run the risk of running out.
- It's only really effective in smaller aquariums and its gets expensive for bigger ones.
Pressurized CO2
Pressurized co2 is kind of like the golden grail when it comes to co2 supplementation.
As said above they are more expensive to purchase and tanks running pressurized to tend to be more demanding in terms of maintenance. But on the other hand they will provide a steady supply of co2 to the tank, are fully costumizable to suit the tanks needs, allow for use of larger aquariums and can be turned turned off at lights out to avoid danger for your fish.
To setup a pressurized co2 system you can either buy an aquarium brand dedicated system which is more expensive and generally not compatible with parts other than ones from that particular brand or buy the parts seperately and build one tailor made for your needs. Before we only had the possibility between the aquarium branded systems or shopping the parts individually from companies that don't generally sell them for aquarium use, but are still pretty much adequate to get the job done.
However we have recently seen the rise of online shops like CO2 supermarket or co2 art that sell aquarium dedicated systems at a more reasonable cost and yet still allow for the high level of costumization of buying non aquarium related systems.
To setup a co2 system here is a list of parts you will need:
- Co2 regulator
- Needle valve
- co2 cylinder
- bubble counter (optional)
- Solenoid (optional)
- non return check valve
- co2 tubing
- diffuser
Co2 regulator
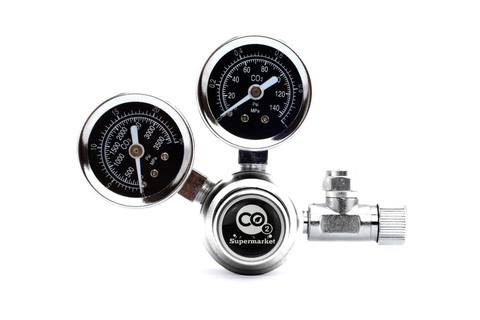 |
| CO2 regulator complete with needle valve - photo credit to CO2 supermarket |
Co2 is a gas that is stored at high pressure inside the cylinder, so much that a sudden unregulated realease of pressure would turn the cylinder into a missile. So when playing around with pressurized always make sure you use quality equipment and that you use it safely.
At these pressures it would be impossible to dose it into the aquarium, to avoid this issue we need a regulator, its basically a valve that is attached to the exit of the cylinder, it may have or not one or two gauges that will give you the readings of the pressure inside the cylinder and the pressure at which you are setting the regulator to release it.
It basically allows you to reduce the pressure of the gas being released to a manageable and safe value. Like i said above you can get these ones from aquarium brands or other co2 related businesses. But my suggestion is never go cheap on this part, because for start a good regulator allows for a better control of the amount of gas you are using, also because it will also be safer and last longer.
Years ago, regulators used to come without the needle valve that allows you to fine tune the amount of co2 being dosed and we had to buy it seperately, but these days they are mostly sold as a single unit.
Needle valve
Even after regulated the co2 output coming out needs to be fine tuned for your aquarium, many times were are talking about a few bubbles per second so for this we use a needle valve. Like i said above and as you can see on the photo, regulators tend to come with the needle valve fitted into these days. The better the needle valve, the higher the control you will have on how much co2 your are dosing.
CO2 cylinders
 |
| Photo credits : Dorry pets |
The co2 cylinder is the vessel that carries the co2, they come in various sizes and can easily be found. Some aquarium companies sell their own branded cylinders, or you can get them from other co2 providers.
In the UK there are strict health and safety regulations regarding these ones, most companies will not refill cylinders that you have not purchased from them, others won't refill them at all, but they will swap them for a full one.
Apart from branded cylinders you can get them from beverage companies, these tend to have rental schemes, where you will pay a rental fee for the bottle plus the gas, these are helpful because every time you run out, you just need to call them and they will deliver a full one to your home and take the empty.
Another solution is co2 fire extinguishers, they are cheap and readily available, and with luck you can even get your co2 for free.
Contact your local fire extinguishing company, they may refuse to sell them to you, but if you explain that you just need the gas and what do you need it for, they may give you a good price.
You can ask them for out of date extinguishers, for safety reasons, extinguishers have to be replaced regularly to make sure they are fully functional in case of a fire, the ones that are out of date are sent for recycling or disposal, you may be able to convince them to lend you one of these ones as long as you promise to bring it back once its empty, reason is the company needs to pay for the co2 to be emptied before the cylinder is sent for disposal, by using the co2 in the aquarium you're actually saving them money. I haven't payed for co2 for more than a year.
You may also use smaller paintball cylinders or the ones from sodastream, though these ones tend to need a different type of regulator.
There's a large amount of options when it comes to these, all of them work as long as they are used safely.
Bubble counter
 |
| Regulator co2 bubble counter - Photo credits co2 supermarket |
These are optional, a bubble counter is basically a way of measuring how much co2 you are actually dosing. There are different styles, some are attached to the regulator (e.g photo above), others are placed inline, attached to the tubing that carries co2 into the aquarium.
You can measure how much co2 you are dosing by checking the amount of bubbles being released and how fast this happens, its a pretty simple piece of kit and its effective as a guide to help fine tune your dosing.
Solenoid valve
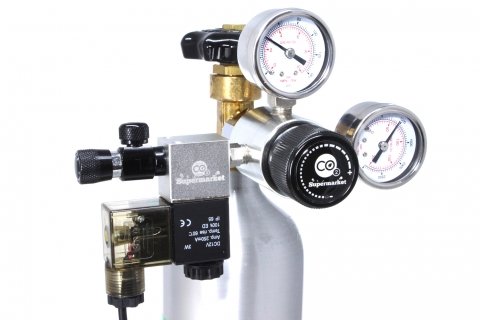 |
| Regulator with solenoid valve in place - Photo credits : Co2 supermarket |
The valve in itself does not allow for that degree of costumization, it allows for the system to turn itself on and off, but to be able to do it it needs to be on a timer that allows it to be programmed. Lucky for us any cheap analog or electrical timer can be used, once the timer is set and the solenoid is plug to it, your co2 supply will start and finish at the preset times.
I always advise to start the supply one of two hours before the light comes on, this makes sure that by the time the lights come on, the amount of co2 in the water will be at its peak. Turning off can also e done about an hour before the lights shut down as the tank by then will have enough co2.
Because plants do not use co2 at night, in fact they will release co2 the use of a solenoid to shut it down will prevent the concentration of gas going into dangerous levels for your fish while at the same time allowing you to save gas and extend the duration of your cylinder.
 |
| Inexpensive timer that together with the solenoid valve allows to customize the usage of a co2 system - Photo credit - Homebase |
Non - return check valve
 |
| Precision check valve - Photo credit Co2 supermarket |
One of the problems of using a co2 system in the water, is that many of its components can be damaged by it. Regulators and solenoids especially are vulnerable, and one of the dangers is that when the co2 system is shut off the differences in pressure will make it so that water can drain from the tank through the co2 tubing. To prevent this we have she non- return check valve, its basically a valve that is placed in the co2 line, preferably right before it enters the tank. This valve prevents water draining from the tank from entering the system and damaging it. You can find them in all kinds and forms, plastic, stainless steel and even glass, but they are a simple design and fairly inexpensive, not using one on the other hand can become quite expensive.
Co2 tubing
 |
| Photo credit : Co2art |
While some people use air hose in their co2 systems, overtiem it gets brittle, changes colour and may even lead to some co2 being leaked. When setting up the system one should use co2 graded tubing, its easy so spot the difference, co2 tubing is thicker and more rigid. Its not a must, but when possible this is the type of tubing that should be used in a pressurized system.
Difusser
Finally we need a co2 diffuser. This is were the co2 will be diffused into the aquarium. There's quite a few different types of co2 diffusers in the market and they come in all types of shapes or form, but the essence the function is the same.
- Ceramic diffuser
- Ladder diffuser
- Inline diffuser
- Co2 reactor
Ceramic diffuser
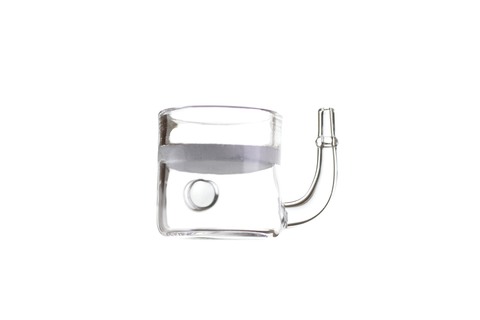 |
| Glass ceramic diffuser - Photo credit : Co2 supermarket |
However no matter how good the diffuser it does not provide a 100% diffusion and some gas ends up being lost through the surface.
Ladder diffuser

The inline co2 diffuser is an external diffuser that is placed in the return line of your filter. This means co2 gets diffused into the water being pumped back into the filter, this allows for the100% diffusion rate by the time the water reaches the aquarium.
Its been many years since i have used one of this, the ladder diffuser is an internal diffuser that aims to achieve as close to 100% diffusion. The co2 comes out of the tubing but instead of just floating to the surface it is than lead slowly trough the ladder, you can actually see the bubbles getting smaller and smaller as it reaches the surface. The disadvantage is that they look unsightly in the tank but they do have an increased efficiency.
The inline diffuser
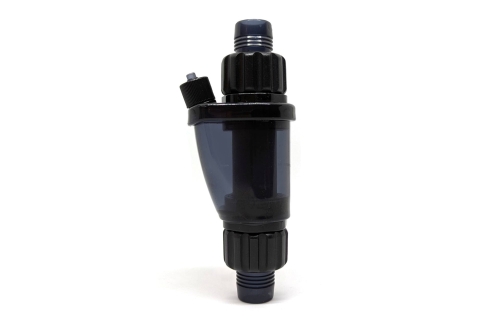 |
| Up inline atomizer - Credit photo : Co2 supermarket |
Its design is the same of the ceramic difusser, inside it theres a ceramic cylinder through which co2 gets broken into fine bubbles which then get mixed into the water that's being pumped back into the tank.
The co2 reactor

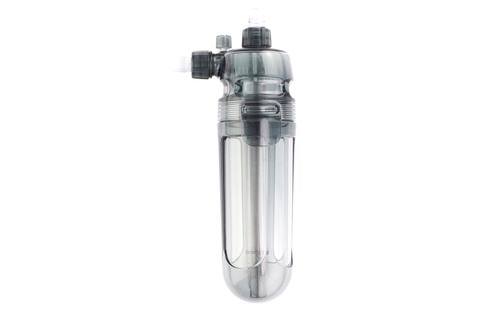 |
| Co2 reactor - Photo credit : Co2 supermarket |
The co2 reactor can be external or submersible in the tank. I most commonly see the external type being use.
They are placed in the filter return line just like the inline external diffusers, however they don't rely on ceramic diffusers to achiever 100% diffusion. Instead they use a set of impellers that spin inside the reactor as water mover through it, this movement breaks down and mixes the co2 with the water guaranteeing a 100% diffusion is achieved
Measuring the amount of co2 in the water
With the addition of co2 into the aquarium comes the need to find out how much we have in the aquarium.
The bubble counter mentioned above gives you a loose idea of how much you are dosing, but as for how much there is really in the tank, there's to many variables for one to be sure. Stuff, like gas exchange, type of diffusion, water chemistry, fish load, plant mass can deeply affect how much co2 is in the water at any given time.
While experienced hobbyists learn to judge this just by looking at the behavior of their plants and fish, for the least experienced there are some other methods of measuring this.
Its regarded that the safe amount in the aquarium both for fish and for optimal plant growth is of 30 ppm as in parts per million. Once again this may vary, its more important to have a fixed constant supply that a large amount of it. A lower energy tank will not need such a high amount of co2 in the water.
That said even though its not possibe to be 100% sure of how much co2 is in the tank, there are a couple of ways that can help give an idea.
KH/PH chart
This chart measures how PH and KH relate to each other.
When we dose co2 into the water it creates carbonic acid, this in turn leads to a decrease of the PH in the aquarium. To confirm this all you have to do is a test, measure your PH before co2 is on, then measure every hour after co2 diffusion starts, you will slowly notice a decrease in the PH.
Then measure the KH which measures the carbonate hardness and these two values we can measure the amount of CO2 in the aquarium with the help of the chart above. Basically where the PH and KH values intersect with one another is the concentration of co2 you'll have in the water.
This is not 100% accurate, its more of a guide, this is because the comercial tests are not very accurate, but also because KH values may be affected by the amount of nitrates and phosphates in the water.
Drop Checker
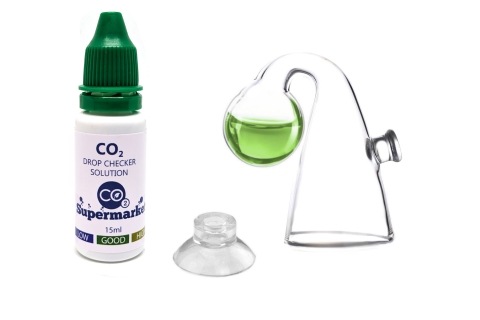 |
| drop checker and solution - Photo credit co2 supermarket |
A drop checker is a more reliable way of measuring co2 because it isn't affected by phosphates and nitrates. Its basically a small container, either plastic or glass that sits inside the tank, this container is filled with a solution of water and bromothymol blue. Its the same reagent used on the PH testing kits. In essence co2 in the aquarium enters the container and reacts with the solution causing it to change colour. Green means you are at optimum concentration, blue not enough and yellow too much. Its a simple method that with experience most of us do without, but it can be a helpful relatively inexpensive guide.
I hope this guide not only helps to understand the benefits of using co2 in the aquarium , as much as the many options to use it. Its not a must, planted aquariums can be kept without it, but if you are really into aquascaping then there's no other way to go.
Sources:
Pratical fishkeeping : Gas vs Liquid carbon
Pratical fishkeeping : what can co2 do for you and your plants?
Aquariuminfo.org - Co2
Liveaquaria
Liveaquaria
Aquarium Gardens co2 guide Sunken gardens - The myth of liquid co2
Aquascscaping - importance of co2 in the planted aquarium
Co2 striking the balance
https://m.facebook.com/notes/waterforestaquatics/glutaraldehyde-revisited/1967969880126864/
Comments
Carbon Dioxide Cylinder
Great article to read! You can experience your very own National Geographic adventure at this one-of-a-kind aquaria. Just click here and visit their website.